This post describes the main actions that you can perform while working with messages.
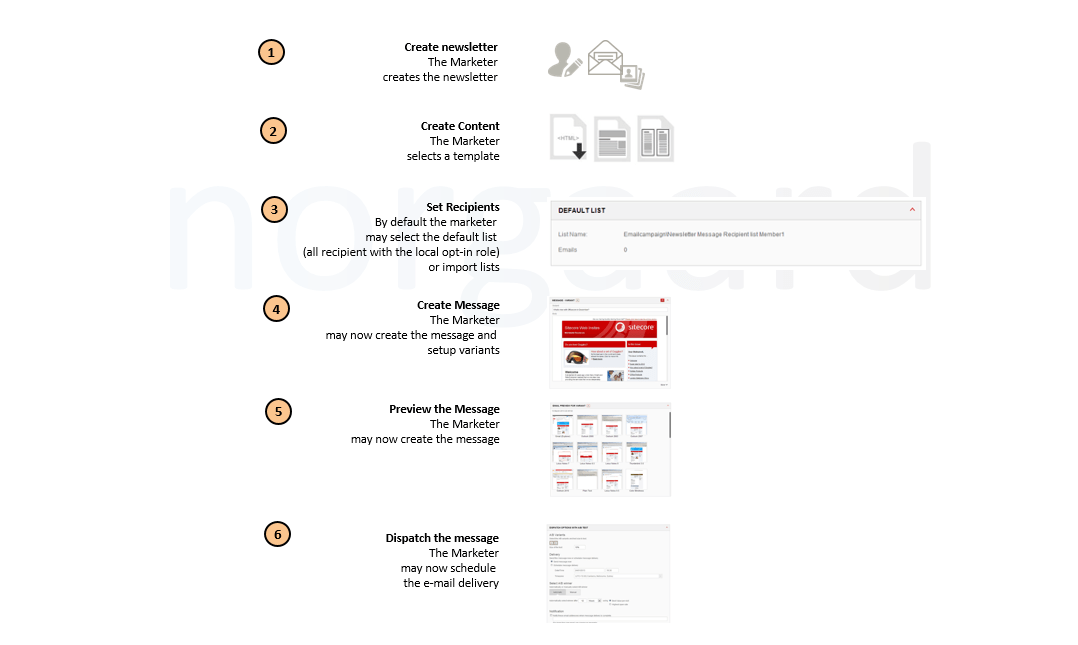
- Select Message Type – The creating of a new email campaign starts by selecting one of the available message types, which covers “One Time Messages”, “Subscription Messages” or “Trigger based Emails”.
- One Time Message – one time Messages are messages, which are intended to be dispatched once for a specific purpose to a recipient list selected specifically for the message. For example, this could be a special campaign email dispatched for recipient’s enticing them to engage with your business.
- Subscription Message – Subscription messages are messages, which are intended to be dispatched regularly to a specific recipient list. For example, they could be subscription newsletters or recurring information messages, such a monthly newsletters.
- Triggered messages are messages that are sent to a single person at a time, when triggered by a specific event or in a specific flow. For example, this could be sending a message to user when they register for a website, or to a user who visited the website once but has not returned for three weeks. Unlike subscription messages and One Time messages, triggered messages do not have a fixed or defined number of recipients, since the module knows the recipient only when an events or a condition is triggered by that recipient
- Select Message Template – Once the message type has been created; the marketer must selected a message template from one of the available templates
- Specify General Settings – Once, the template has been selected a name must be provided to the message and additional metadata, such as the sender information and reply-to information.
- Select Recipients – Once a message has been created, the intended recipients must be added. By default, this will be specified for subscription mails by the specified opt-in and opt-out roles. Otherwise, it is also possible to import a Sitecore list and use it as a recipient list or import a recipient list from a file.
- From the Sitecore List selection, it is possible to select users based on other Sitecore Roles. This may pose an issue for marketers, as security trimming must be in-place, to disallow marketers access to each other’s lists, which is not be possible without unintended customization. The functionality may therefore not be desired for certain businesses.
- From File – allows email marketers to import users from csv files together with user properties. However, it works across the user profile base; it needs to be ensure that user properties are not compromised i.e. overwritten in the process.
- Created Content – During this step, the subject line and message body can be created. The content editing itself follows the normal CMS procedures and use modules as building blocks.In addition,
- A predefined $name$ token may be use for replacement token with the actual name of the recipient.These may be extended accordingly, such as the membership number in a customer database.
- Attachments may be added to the message
- Different language settings may be created
- Text, images, text formats, and content element may be changed.
- Insertion of links and action buttons (images with links, such as deep-link)
- Preview message – once the message has been prepared, it can be reviewed using the following options:
- Send a quick test – this can be done by adding one or more email addresses separating them by a comma. When sending a quick test message links are not supported, as it does not initiate the creation of an engagement plan. External links in the dispatched e-mail are therefore with zero GUID parameters and non-functional. This functionality is a precaution feature to avoid spoofing.
- Preview a message in different email client – this allows seeing how the email message looks in different email clients using an external commercial service. The feature must therefore be enable and signed up through the Email Preview service in the Sitecore App Center.This option depends on a consumption based third-party service, which needs enabled and signed up to a financially account to work
- Perform a spam check – allows testing messages to see how different spam filters will treat it. This functionality also uses an external commercial service, hence must therefore be enable and signed up through the Email Preview service in the Sitecore App Center.This depends on a consumption based third-party service, which needs enabled and signed up to a financially account to work
- When a message has been prepared, it can be scheduled for dispatchment and set to comply with the recipients preferred language.
- Send Immediately – the dispatchment of the message starts instantaneous.
- Schedule message delivery – the dispatchment is schedule for a specific date and time according to a given time zone. Typically, the timezone where the server is hosted.
- Use Language Preference – during dispatchment, it is also possible to create message versions in preferred language. Given that an email has been created in multiple languages and the recipients in the recipient list have different default content languages set, then the marketer can send the message in a recipient preferred language.
- Any dispatchment of e-mails made through the MTA (Message Transfer Agent) has a cost. Therefore, an agreement must be set with the local banks. This is an upfront payment, which depends on the volume and commitment period.

Leave a comment